Make a round 2 inch hole in the air box cover besides the stock intake
hole.
The stock intake restricts the motor from 6500 rpm and up... (Dyno bench results clearly
shows it)
Remove the stock velocity stack (the rubber intake boot or whatever you call it)
Drill out the round brass plug underneath the carb (close to the intake manifold),
make the hole big enough for a self tapping screw and wiggle the plug out.
Be careful not to damage the pilots screws underneath the brass plug while drilling.
Adjust the pilot screws 1/2 turn out from stock setting, anti-clockwise. (stock setting
is around 2 1/2 turns out from fully seated, be careful not to damaged the seat...)
Replace the stock #102.5 main jets with #127.5 Mikuni type "N100/604 Large
Round".
Replace the stock #37.5 pilot jets with #35 Mikuni type "N151.067" or
"BS30/96" (doesn't matter which).
Shim each throttle needle by 2 pcs of 3 mm stainless steel washer, each is aprox .025 inch
thick.
Check the float height, it's very important for slightly off idle and slow cruising. Set
the floats to 14.5 mm
measuring from the float bowl and the bottom of the float when the needle valve spring is
barely closed
and should not compress the spring at all, just barely seated. Compress the plastic
arrangement as the
bowl would do when assembled before you measure the height, it will give false readings
otherwise.
The bigger main jets overlap the pilot jet range and because of that the pilots needs to
be
smaller in size. The #35/#127.5 setup gives optimum power when the motor has been
warmed up and it's verified by both (countless) Dyno runs and on the road and drag strip
with an air/fuel monitor. Check out all of my Dynorun on the Dynorun page.
My air/fuel ratio with #35/#127.5 and 0.05" shim with pilots screws 1/2 turn out
from stock setting with the stock air filter was:
1/2 - WOT 12.5:1 - max power on the drag strip
1/4 - 1/2 13.5:1 - piston and valve saver in the mountains
1/8 - 1/4 14.5:1 - perfect for highways, good fuel economy
Idle- 1/8 12.0:1 - no spitting, coughing or stumbling at traffic lights
Replace the stock exhaust muffler with a free flowing exhaust since it's strangeling your
bike!
This setup was tested with a Kerker K45 bolt-on cannister but anything goes. If you remove
the stock
muffler completly it will not affect the result since the elbow pipe itself contains a
(LOUD) muffler.
One last note, if you bike coughs and spits back when cold, that normal behaviour when the
motor is cold.
That's why they fitted the bike with a choke circuit. Use it. This is normal with a
carburated motor, with
fuel injection you don't need a choke - it's built-in into the injections open loop
software.
Good luck!
![]()
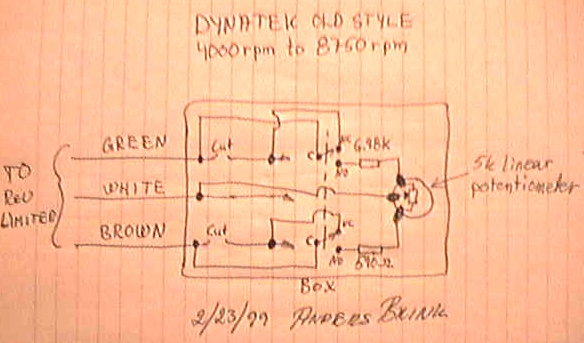
The old style Dynatek two-step rev limiter comes with an adjustable launch rpm setting from 6000 to 8750 rpm in steps of 250 rpm. For a street bike with only a 6 inch over swing arm 6000 rpm could be a little too much so I decided that I had to do something about it. My modifications below extends the launch rpm limit to be adjustable between 4000 rpm to 8750 rpm. $15 for the material, really cheap!
Material:
One dual pole switch (6 connectors), used to switch between stock and modified rev
limiter.
One 590 ohms 1/8W resistor. One 6.98k ohms 1/8W resistor. One 5k ohms linear potentiometer
with a knob.
This is the circuit diagram for the modification, please feel free to e-mail me for any questions, suggestions and/or ideas.
![]()
I'm using one extra Barnett clutch spring. At least it's good for 208 rwhp. I have replaced some of the thin steel plates with the same type as the thick ones. It withstands the heat during drag race a little bit better. If your steel plates gets warped, don't try to fix them, buy new ones. If you have ever used synthetic motor oil in your bike and the clutch starts to slip, replace the oil with a good mineral oil such as Castrol GTX 20W-50 or similar. To cure your slipping clutch you can sandpaper the fiber plates which removes the hard black residue. Clean the fiber plates thoroughly to remove any grinding material/debri, you don't want that to destroy your precious motor.
When you reassemble the clutch basket, make SURE that the clutch basket gears are lined up with BOTH the generator AND crankshaft gears. You'll bust one or all sprockets if you're not careful when you torque the clutch hub nut.
![]()
Most sanctioning bodies, ProStar/IDBA etc requires that the NOS bottle to be supported in such way that it cannot be dropped from its bracket. This means you have to modify the stock bracket with an additional bottom support. The NOS and fuel solenoids can be mounted in any position, this isn't explained in the installation instruction but confirmed by numerous racers with long experience (Bill Vose for example). Make the fogger lines equal in length for consistent pressure to all four manifolds. Speaking of manifolds, most experienced racers put their foggers in the rubber manifold to elliminate vibrations and to keep the foggers as far away from the intake tract as possible to maximize the fuel atomization/vapourazing, so did I. You have to bend the left branch of the Y-shaped oil distributor towards the cylinder block to clear fogger #2. The use of an fuel pressure safety switch is optional but strongly suggested to prevent nuked pistons. I'm using one. Besides the WOT throttle micro switch, thumbs button on the handle bar I'm using an Suzuki GS 80-82 5 gear shift indicator that allowes the NOS to be activated in 2nd gear and up. You don't want to look THAT foolish at the starting line do you?
![]()
The V&H Pro Pipe 12002P was designed for the 86-90 GSXR1100 but can be installed on the Bandit 1200 with small modifications. First you have to tweak and bend the oil cooler hoses to clear the header pipes, takes a while but doesn't look that bad. Make sure you support the oil cooler fittings while you bend the steel hoses or you will end up with a damaged oil cooler. Next, the rear brake lever. You have to grind off 1 mm from the brake lever's "top stop" to gain more travel and clear the megafon. The drawback is that you end up with a slighly higher positioned brake lever. You have to cut 10 mm off the 8 mm bolt that goes into the brake cylinder to be able to use a 20 mm long 8 mm coupling nut that connects the brake lever U-shaped bracket to the brake cylinder bolt. Use a 10 mm long 8 mm bolt to fasten the U-shaped bracket to the coupling nut. The megafon bracket mounts to one of the rear peg bolts, perfect fit. Use a 20 mm longer bolt than stock and use a nylon lock nut and washer on the inside. I installed a 2" baffle to maintain the streetabilty..
![]()
The shift detent lever is a cheap design, when you have the motor
completly disassembled you should shim the detent lever in such way it will ride in the
middle of the shift drum cam. Let there be a 0.02 clearance. If not modified (shimmed) it
may cause the gears to pop out and have false neutrals. Check out my picture of the shimmed detent arm.
Be VERY careful at reassembly, don't overuse the RTV goo. Make sure that it DO NOT come near the oil galleys for the gear box and crankshaft. The 6 mm bolts and nuts should NOT be torque to more than 7 ft-lbs, it states otherwise in the service manual. Make yourself and your bike happier, 7 ft-lbs on 6 mm. Make sure you use a lot of moly paste on the crankshaft bearings, rod big ends. Everything else should be soaked in fresh motor oil. Replace the Philips screws for the shift mechanism with Allen type.
Don't disassemble the oil pump unless you suspect there's some debri in it (the pump gears HAS be in their ORIGINAL position).
Torque the cam chain tensioner bolt (19 mm wrench) to 14 ft-lbs, it's easy to strip its threads.
HeliCoil the 7 mm cam bearing caps for the valve cover bolts, you'll be thankful after the 3rd valve adjustment.
Before you fire up the motor, check out "Dr Brock's" break-in procedure, it's a fast and reliable procedure to get your street or race bike in top shape after a rebuild. Prepare yourself with 2 gallons of Castrol GTX 20W-50 and two new oil filters.
![]()
My own reflections: Don't buy used camshafts. Buy a new set of cams instead. Race cams is very often not hardened correctly and will start to pit after a couple of thousand miles. Check the rockers VERY frequently, the chromed surface will eventually flake off - it's just a matter of time. Don't torque the rocker screw's nut too much, you'll strip it's threads. You only need to buy new nuts, the screw's are hardened and will survive the abuse. The Bandit (or GSXR) will only accept .380" cams due too retainer to valve seal clearance. The stock pistons will not accept .380 cams unless you go higher (larger number) than 106 degrees on both intake and exhaust.
There are four major manufacturer of camshafts, Yoshimura,
Web Cam, Cam Motion and Megacycle. All four of them makes a .380" lift cam for the
GSX-R1100 which gives a valve/piston clearance of .050 - 0.060". Adds aprox 10hp.
Slotting the cam sprockets is a must for maximum performance. Cope Racing has Falicon slotted cam sprockets for the Bandit.
Properly dialed in slotted cam sprockets can gain +4hp over stock cam timing.
Performance Bikes used 112/106 (intake/exhaust) timing which gave top end performance.
The -98 IDBA Street ET champ Brad Stagg
has got Yosh Stage 1 @ 102/105, Yosh SSR2 pipe and 36mm Mikuni RS.
The original (stock) B12 intake cam has 0.331" lift
-90 GSX-R1100L intake cam can be installed without modifications, gives aprox 5hp extra.
Megacycle makes a very similar intake cam but recommends stronger valve springs and Yosh doesn't. The Yosh exhaust cam has less lift than the megacycle making piston clearence easier and most top R motor builders say its way over exhausted anyway.
Have seen both mega cycle and V&H regrinds go south as well as welded up rockers, the Yosh cams do look nice actually they are hard to tell from stock in apearence. if you want good cams try the Suzuki cams unless your wanting to get real radical. The '90 gsxr 1100 and '88 gsxr 750 cams are much larger than the stock B12 cams and yes they are different from year to year even though the C/L and duration specs are the same the profiles are different. by the way the numbers on the cams 27A for example mean nothing except the casting .
Beware the megacycle: They will come from them ostensibly clean and ready to install, and be saturated in grinding dust and chips. Their surface hardening does not always work. Their springs are so hard that they wear followers terribly. They do make some good cams, but be careful.
Anders, the .380 lift cam part # 44107 for the early style GSXR heads 86-90 is made by Cam Motion. These are the only cams I would recommend and they fit the Bandit head. We can get you a set of slotted cam sprockets from Falicon Engineering, the price is $38.00. I have not had experience with the lock-up clutch for this model.You will probably have to convert your hydraulic clutch to manual clutch lever, get internal spring type clutch components from an early GSXR 1100 1986 - 88. Then you might be able to use early GSXR lock-up clutch. I suggest you contact M.R.E at 1-800-237-7723.
![]()
GSF1200 stock cam specifications (thanks to RFRR900):
Intake at 0.001" lift:: open @ 42 deg BTDC, close @ 65 deg ABDC, duration 287 degrees
Intake at 0.040" lift: open @ 5 deg BTDC, close @ 32 deg ABDC, duration 217 degrees
Intake lobe center line: 104 degrees
Exhaust at 0.001" lift: open @ 52 deg BBDC, close @ 27 ATDC, duration 259 degrees
Exhaust at 0.040" lift: open @ 32 deg BBDC, close @ 6 deg ATDC, duration 218 degrees
Exhaust lobe center line: 103 degrees
GSXR1100 86-90 stock cam specifications:
Intake at 0.001" lift:: open @ 42 deg BTDC, close @ 70 deg ABDC, duration 292 degrees
Intake lobe center line: 104 degrees
Exhaust at 0.001" lift: open @ 65 deg BBDC, close @ 39 ATDC, duration 284 degrees
Exhaust lobe center line: 103 degrees
When installing GSXR camshafts on a Bandit you can/should install slotted cam
sprockets,
can be bought from Falicon Crankshaft Components,
$45 for a set of sprockets.
![]()
Shaving head, max 0.088" (1.5 mm) gives aprox 5 - 10 hp. Note, this makes it IMPOSSIBLE to replace the stock camshafts with a set of high lift cams (bigger lift than 0.350") without any modification to the pistons. The valve clearance would be NULL, NOLL, ZILT and ZONK'ed with stock pistons. Dale Walker's Holeshot Performance JE 1157cc 11.5:1 piston has deeper valve pockets and can handle a 0.380" lift cam if set to 102/104 or greater (for example, 103/106 is fine).
A snip from Performance Bikes (UK). Bandit 1200 mods, a 1.5mm (0.06") skim increases the compression ratio to 11.4:1 and retards the cam timing by 2.7 degrees (which in this case was desirable). They got 120.3 hp by the milling and a Skorpion exhausts system, by slotting the cam sprocket they achieved another 4 hp. They thought that 112/106 was the best phasing.
A 88-89 gsxr750 slingshot head (22 cc) will raise the compression 1.5 points compared to a stock B12 (26.5) cc head.
![]()
The stock pistons has got a 0.035" cut for the exhaust valve and a
1.050" cut for the intake. This makes it possible to put a .380" lift cam with
250 degrees duration into a stock motor - but... you'll need more compression to gain
anything from the high lift cam. You can shave (mill) the cylinder head but then you'll
have to cut deeper into the pistons. Cost for a cut is near $10 per valve, total cost is
$160 from almost any machine shop. Another solution is to buy a new set of high
compression pistons from Dale Walker's Holeshot
Performance that will fit the Bandit without any other modifications than a simple
deglazing of the sleeves (max $30). By that you'll get a piston that has a valve cut on
the intake of 0.130" and the exhaust 0.085". This is more than enough to clear
the valves. The valve/piston clearance will be near 0.088" (2.25 mm) if you don't go
below 102 degrees on the cam timing.
![]()
Set your piston to deck height at 0 or just a few thou under. Most copper gaskets will give you .040"n to .043" clearance. If you dummy assemble the head without the head gasket you should be able to turn the engine over with the pistons clearing the head. You can also use modeling clay (Plastacine and plastigauge) lay flat strips over the pistons and with the head held down turn the engine over. Remove the head and check the thickness of the clay/plastigauge. This will give you a shure indication of running clearances all around the piston. To run it safe give your valves .060" clearance to the piston. Start by checking the inlet valve over a spread of 15 degrees. The closest reading will be at around 5 degrees ATDC. The exhaust valve will give the closest reading at about 5 degrees BTDC. It is possible to run as low as .040" piston to valve clearance but you have to make shure you use good springs and be prepared to check and change them quite often. Play it safe and run .060" and everything will stay alive and happy for a long time. //Angelo Ganitis
We recommend minimum .065" exhaust and .045" intake. It would probably safer to run the exhaust up around .080" in case of missed shift etc. Squish would depend a lot on how fresh the crank is. A worn crank will need more clearance. //Jay Eshbach
To adjust the Lectron needles turn them clockwise to richen the mixture,counter clockwise to lean them.Hold the slide in one hand and use a pair of pliers with a paper towel or something so you don't damage the needle.Hold light downward pressure on needles while turning them.Turn the needle 1/4 turn at a time,then pick the needle up and return to its previous location (flat side facing the intake port.Depending on which way you turn it you will raise or lower the needle .005 for every 1/4 turn.Thus richening or leaning your mixture.A good starting point is 1.870.You should find the right setting between 1.850 & 1.900. Pull down, turn 1/4, lift, turn back 1/4, Drop. Its easier than you think. //Michael Ross
Snippets from http://dragbike.com
Public Forum.
(the famous engine builder) William H. Carpenter wrote on Wednesday, August 30, 2000 -
04:40 pm
Basic theory on a 4-valve engine says because the air can enter easier than a 2-valve it can also leave easier. This means that the "supercharge" effect that you get on a 2-valve motor with big numbers(110+ on intake)only pumps the mixture back into the intake tract. The end result is a motor that runs good up high but really doesn't make the best power. The motor cannot begin to breathe until the intake valve is fully off the seat.
To get maximum effect the valve should be open as far as the valve cutouts in the piston will allow before the piston starts down on the intake stroke. The overlap should be split at this point,if the intake open number is say 20 degrees then the exhaust closing number should also be 20 degrees. \par \par I have found that using short numbers on the exhaust say 15 degrees allow the exhaust valve to clear the just beginning to open intake. You also get some piston safety for valve float. These twisted numbers also give some more blowdown for the exhaust.
All cam timing is subjective,that is give some get some, but this arrangement will give a nice feeling motor. My latest motors use 5 degrees stagger in the overlap split. Short closing the intake valve also allows the motor to begin compression sooner. I only use the lobe center method after I have seen the total numbers.
The standard method of mixing cams should be a high lift,short duration intake combined with a lesser lift,longer duration exhaust. The extra duration on the exhaust is used as openning the exhaust sooner to get more blowdown. The reason that the exhaust is closed sooner on the overlap is to allow the motor to begin to draw. The piston can't suck any intake in with the exhaust valve open. The overlap effect works best if the numbers are bigger on the intake than exhaust with split overlap being the end of the range of adjustment in cam timing.
It is very rare that any engine will work better with the intake lobe center larger than the exhaust. Using the 108 intake 100 exhaust combination is dangerous because the exaust valve will "hang" on closing interfering with the intake openning. There is also less piston to ex valve clearance so if the engine is over revved you get bent valves. The key to power is the intake lobe center with the exhaust moved to keep the torque curve as flat as can be made or with an increasing torque peak. If you use 108 100 the effect will be a late "hit" to get on the power band plus it will die right at the top because of the short blowdown.
The effect of overlap only helps in the midrange. The reason is the exhaust system returns a wave just as the exhaust valve is closing which pulls across the top of the piston to help start the intake flow. The ex valve closes and the piston which is going down now continues to draw as the intake finishes opening. The point of max piston speed occurs when the con rod is at 90 degrees to the throw which is like 75 to 78 degrees after top dead center.
The biggest help is to get the intake open as far as possible before the piston reaches max speed. When the lobe center is big like 110 the piston is pulling against a valve that is not open very far. The use of lobe center in a discussion is decieving unless you know the total numbers ie IO at 20 BTDC IC at 50 ABDC and IO at 30 BTDC IC at 60 ABDC both are 105 lobe center. The cams are degreed using a number like 1mm lift(.040). The reason this is done is to be sure that valve motion has started. The reason for .040 is assuming that flow cannot take place until the valve has moved that far off the seat.
Using stock cams the valve motions are kind of slow but race cams have a quicker action meaning the accelerations on the valves are more abusive. At some point the valves will collide with something, either each other or the piston. If the cams are mild then the duration is less than what the engine can use,but when radical cams are used they can be degreed wrong on either end. This means that blowback will occur in the intake tract either at overlap(piston near the top)or at the bottom.
If you ride a bike with short numbers they have a cammy sound, rough idle, etc. If you move them to big numbers(110+) the idle will be really smooth because at slow speeds the mixture is being pushed back out by the rising piston. As speed increases the high flow in the intake continues coming in even after the piston is rising giving a "supercharge" effect. This works really well in a 2 valve design because the port is similar to a funnel. On a 4 valve design because the valve areas become large quickly the mixture is pumped back out just as easy as it was pumped in. You must consider all of the valve timing events NOT just lobe center.
If you only look at overlap the amount the intake opens before top center should be equal to the amount the exhaust closes after top center. This is called split overlap or the cams are installed straight up or square. I prefer using numbers that make the ex number 1 or 2 degees less than the intake number this will smooth the idle. If the ex number is bigger than the intake then the overlap effect is wasted.
All cam timing is subjective only you can decide if you like the feel. If the cams are the same total numbers ie 250 degrees of duration then the numbers should be square IO 20 IC 50 EO 50 EC 20 at 105 lobe center. I would prefer these numbers become like IO 20 IC 50 EO 52 EC 18 at 105 intake and 107 ex lobe center. Lately my stagger numbers are more like IO 20 IC 50 EO 55 EC 15 for 105 intake and 110 ex lobe center. The next choice to move the power band would be IO 25 IC 45 EO 50 EC 20 for 100 intake and 105 ex lobe center.
All engines feel similar ie a 110 lobe center motor will want to run up high and be dead at the bottom a 100 lobe center motor will run strong at the bottom and tend to die up high. My bikes are Honda 4 valve motors and I have many different engine sizes and cam shaft combinations. It really suprised me when a larger intake cam slowed the bike down regardless of lobe center this means the mixture was being pumped out either at the top or at the bottom.
Later the very same day:
I have discovered a unique effect. A low compression engine will have an open combustion
chamber. The effect is a room with
doors open at each side for the overlap effect to work. A very high compession motor is
different. The piston fits very close everywhere
and the combustion chamber? ends up being the overlap cutaways for the valves in the
piston,a four leaf clover. If you watch down
through the spark plug hole you can see the piston coming up to top then it rocks
preparing to go down. Then the intake valve shoots
out and chases the piston down. If you put the valve in the cutaway you get the effect of
pulling your foot out of deep mud. The piston
motion itself draws directly on the intake column. The effect of overlap is diminished
because the piston is in the way because the
exhaust valve is a convoluded path away. The intake is the key to power, the exhaust has
very little to do with peak but can smooth
out the torque curve.
![]()
A word of wisdom from Larry Cole regarding replacing the Bandit engine:
Anders, I put a 90 Katana 1127cc motor in my 97 Bandit. I'll try and tell you the differences between them. First off the 89-93 Katana 1100's and the 89-92 GSXR's are basicly the same motor as the Bandit 1200's. The Cams are the same in all the above mentioned, except the Bandit. The oil pan and valve cover is different on the Bandit. The clutch is the same as the GSXR's, but not the Katana. The GSXR uses diaphram springs and the Katana uses 5 springs. The Sprockets on the motor are all the same. Ign. advancers are interchangable, and work on the Bandit. You already know about the cam tower, and thats the reason the valve cover is different. The 86-88 are 1054cc motors with a different stroke. If you put the Bandit crank in a earlier motor and bore you can get 1127cc. So stay with the 89-93 Kats and 89-92 gsxr's and your practicly the same motor. Tha Katana has a different final output ratio than the GSXR, thats why they use different gear ratios. Thats about all I can think of right now, hope this helps a little.
Anders, the B12 clutch is totally different , no you cant use the '87-88 clutch because its a 1052cc motor and has more teeth on it, the 1127cc or '89-92 clutch may fit i havnt tried it , larry may have though. IMHO a lockup is a waste of money here, i know of 200+hp motors of this type that dont use one, you have no doubt seen them too even if you didnt know it. one guy in particular runs the lockup spacer plate , but not the lockup !! i'm sure i'll forget something but the major diffs as i recall are the cam chain, crankshaft ( because of the cam chain type) cam sprockets, the cams of course. the whole clutch is different ( havnt checked but i suspect the transmission shaft its on is too) , some early R's used a dual pickup ignition so its not a direct bolt in anyway. as far as fit any 750-1100 air cooled advancer will bolt on but not nessesarilly work well. the valve cover has several variations over the years. dont know for sure but i think the cylinder block is a different casting. the oil pan and pickup are different.
Anders, The only thing I had to do to put the Kat into the Bandit was change the oil pan, valve cover, a couple of bolt on wires, so the harness matched up. No electrical probems at all, its really a easy process. You can check out my web pages for some more info. I also put a 600 Kat motor back into the 1100 Katana that I removed the motor from for the Bandit. This also went fairly easy, just a few slight mods. The exhausts bolted right up on both motors. Larry
Some excerpts from dragbike.com regarding swap'ability of motor cases:
Scott Horner, Sunday, December 10, 2000 - 03:33 am
Cody, The slingshot and Katana 750 cases will work(I have not tried the Katana yet). If
you run the 1052 crank you only need to slightly modify the cases for the primary gear and
#3 rod. If you run a 1127 crank you need to clearance the cases more for the larger 1127
primary gear (no problem) and the # 3 rod ( watch not to get into the oil galley). If you
plan to run Carrillo's, I usually remove the material behind the # 3 rod, it is an oil
galley to the tranny input shaft. I will machine the case until I am 2/3rds of the way
through the galley. I then weld the oil galley shut and drill the galley at a slightly
lower angle into the large oil galley that feeds the mains. I then go back and machine the
cases for the # 3 rod clearance. If runnig Carrillo's get a bolt with the short head. A
1052 cylinder will drop right in the 750 cases. For a 1127 cylinder, the cases need to be
bored aprox. 1mm. I have run big blocks in the 750 cases without a problem. Like Jay said,
you will need to run the small starter. New, the 1052 cranks are $50+ more than the 1127,
about $855 good guy price
Alan Herriman, Sunday, December 24, 2000 - 07:40 pm
you can run a 1052 crank & rods in 88&89 750 cases, even use 750 6sd box. didn't
have to modify cases, fit 1052 clutch & change gearing
to suit, (42/15 used on mine),3800rpm/100kph.with a good head,(108cfm/.350), 36mm cv
carbs. only used for street use, but never had
trouble with 750 box, pulled into top at 270kph. not many roads around where i live to leg
out top gear
![]()
Anders, Iv'e just installed the same kit in my 97 B-12-carbs are the same. I talked to the Dyno jet tech, you need to remove the nylon spacer from the stock needles and drill them out with a #31 drill (you can use a 1/8inch drill but the 31 makes a snug fit for assembly) . Then assemble the needles form bottom to top-stock metal washer-nylon spacer-E clip in the #3 groove-dyno jet washer- white plastic sping retainer. The original instructions say nothing of the stock bottom metal washer, it must be installed or lean midrange will result. I'm currently putting 104 main jets in (ordered from dynojet, $8) to complement my kerker K-45 silencer with a 1 1/2 in. baffle.
My experience has been that having a reputable shop sort out the carb jetting by running the bike on a dyno, with an exhaust gas analyzer, can yield a significant power gain for a reasonable expenditure, when combined with the after-market muffler. Figure $200-$250 for material (JET KIT) and labor. After that, an ignition advancer,approx $40-60 (material only, as it's installation is pretty simple), seems to yield low to mid range smoothness, little or no increase in top end HP. So for around $300 (if you install ign. Advancer) You will get a real seat of the pants type increase in power, measuring approx. 10-20HP, depending on components, mechanical competence, and the optimistic level of the Dyno. Opinions / experience will and do vary.... Of course, just by typing this I have: voided the remaining Suzuki factory warranty on my Bandit, your Bandit, any.
Subject: RS & FCR carbs, jetting:
Jetting problems with jet kits exist because different headers provide different exhaust restrictions.
It would be a simple matter to re-jet your carb except for the fact that your carb is a CV type. Constant velocity carbs are great for OEM because emissions are minimized. Almost all bikes have had CV OEM carbs since 1980. CV carbs are not very useful for high performance applications. They are difficult to tune at best and non-workable depending on your motor. The basic problem with CV carbs is how it works. Airflow, vacuum, determines slide position. The interaction of the slide spring, slide air holes, diaphram, and butterfly valves can be very delicate.
Adding an aftermarket header may or may not cause problems depending on the bike and the header. A higher performance header will cause more problems. Race header such as the Yosh RS-3 can change things to the point where you may only be able to get the carbs good enough and then live with it. Most riders will deal with the slight hesitations or small dead spots that result.
Adding a piston kit or aftermarket cams may cause havoc with any idle. The flat spots and hesitations will be worse. EXUP bikes are especially prone to trouble.
Jet kits come with springs, main jets, drill bits, and instructions. What they don't come with is a chart showing exactly what you are doing for your exact application.
Re-jetting CV carbs is very time consuming. There is an alternative.
Mikuni makes the RS series carbs for normal flow applications. Keihin makes the FCR series carbs for downdraft applications.
Both these carbs are smoothbore flatslide carbs. These are real performance carbs. They work everywhere, street, track, and strip.
They cost money, especially the Keihin, but these are the carbs to use for true high performance.
I have installed probably a dozen or so RS carbs and 1 FCR unit. These things cost money $500-600 for RS and $900-1000 for FCRs.
For RS carbs the rule is the bigger the carb, the more you need to lean it out for a mild machine. I have never had to mess with the needle on these, but with a dyno and exhaust gas analyzer you could probably tweak them in a bit. For 34mm carbs running a 120 instead of the 125 it comes with is common. They come with 3 sets of jets besides the ones in the fuel bowl, a 110, 115, and 120. The 36mm come with 130 mains, 125, 120, and 115 size just in case. I have never had to adjust these except for mixture screw. I only have done one 38mm RS carb. Put that on an FJ1200. Had to go with a 130 main. The 135 was too rich for the FJ even with the 1220 wiseco kit. The FJ was more work also due to the small manifolds and rigging up the choke cable. I did suspect the needle needed dropped at least a half notch, but the owner never brought it back. I have ridden it since and I still think it's a bit rich 1/2-3/4 open.
The Keihin went on a '97 Kaw 900R with a Yosh race pipe. The guy bought the carb with a kit to use the stock ram air. The 39mm carb bolted on no jet changes. I only rode it once before the operation and then right after, but he says it works great. A very happy rider. As he should be after that. I figure 15HP cost him $1750. But it was noticeably stronger along the entire RPM range. The mid and the high is where you notice it the most. It's hard to gauge these things without taking it out in a couple different situations.
If you upgrade to a true performance header, plan on spending alot of time with your CV carb. Take your time, one change at a time, keep a good record, make all changes cold, do not loose your cool. I refuse to do it any more myself, too much patience required. I'll do RS and FCR carbs, they are easy.
I hope this is helpful, even just to get you thinking about how cost effective your mods may be. Figure whatever you spend on exhaust and intake changes you can only get 10-20 HP max. For many it will not be worth the effort and trade off with flat spots and else. Many headers and jet kits will not get you anything noticeable at all except to your pocket book.
I will admit that I would have to go with the RS-3 and FCRs if I had 900R. The cost difference between the jet kit and the RS carbs is a no brainer. Hell, I'm running these on all 3 of my keepers.
I am not telling anyone to buy anything. This is just the racers option. And also for those like me, who cannot stand to have anything stock.
OldKawMan
![]()
Mr. Turbo advertises on his website that he has a B12 and a kit for $2,695. Adjustable from 150-250 hp. However, I talked to a guy at Bikeweek that claimed to work for Mr. Turbo, he said you could only turn the boost to 150 hp without switching to forged pistons. By the way, at the Horsepower shootout at the Motocycle Institute during Bikeweek, the winner overall was a ZX-11 with 494.9 Hp, with Mr. Turbo and Nitrous.
There are a couple of things that are interesting about the web page (Mr. Turbo, my note).
For one thing, they show an open exhaust, so the street kit would have twice as much plumbing past the header to get the exhaust through a muffler.
"An adjustable horsepower range of 150-250 H.P." seems to indicate that they are letting you run anywhere from 3psi to 15psi on the same turbo. That means the turbo is going to take much longer than necessary to spool up to the 4 or 5psi you could run on the street.
If you talk to them, inquire about getting a smaller turbo in the kit with a max of 8 or 9 psi. Anything past 6, maybe 7 without an intercooler will get ugly anyway, and 6psi will probably net you 160-170hp.
I called the guys at Mr. Turbo a month or two ago to talk about the system shown on their Web page. It was a one-off built for a customer. They also market kits with complete exhaust systems (including mufflers that are quiet).
I also spoke with a guy who has installed the turbo kit in his personal B12 and who makes occassional passes at the strip. He normally leaves boost at the lowest (8 pounds, i think) for street riding. That's good for 140 hp at the wheel. At the track he juices it considerably higher. At max boost, the system pounds out about 250 hp. Egads.
In the four months or so he's had it, he's had NO problems other than clutch. Bandit clutches are not meant to handle greater than 120 hp--no matter what kind of oil you run. There are several options for beefing up the clutch to handle the extra power. Personally, don't know if I could hope to fully use more than, say, 130 horses on the street (where I spend all my time), but it WOULD be an awesome rush, I'll bet, to unleash upwards of 200 horsepower, nicht?
By steve rice on Tuesday, April 4, 2000 - 11:59 am @ dragbike.com Public Forum:
To all who want to know.
I currently am using a SBM solid cylinder block, MTC liners and pistons. .003" press
on the sleeves, 78mm (1109)at .0015"
piston to wall.
O Ringed cylinder block with .040" stainless wire, with .013" protrusion. the
sleeves are standing .003" above the cylinder block
and the cylinder head has receiver grooves machines in, they are .070" wide and
.020" deep, with square edges to help "bite"
the .045" Copper Gasket Unlimited half hard copper head gasket. It is about 2 years
old at this point. The cylinder does not
use a base gasket.
I am holding the head down with 1/2" studs that I had made. The engine cases have
oversize 7/16" studs also. Head is torque
is 45 ft lbs. engine cases to 30 lbs.
Camshafts are stock, lobe centers set at 102 exasut and 104 intake. Valve springs are R
and D with 85lbs on the seat, there is
no port work, but a couple of years ago I had Freedom Motorsports install bronze valve
seats. Valve clearance is .007" to .009"
on the exasut and .006" to .008" on the intake
Crankshaft is stock, with modifications to the oil holes to ensure oil doesnt cavitate on
the main holes at rpm above 11000. I
have installed a 1/2" steel plate on the main bearing cap for reinforcment (like a
main bearing cap on a Z1). Carillo Rods set as
close to .003" as possible.
I lubricate the engine with the stock oil pump with a piston type pressure releif valve
that has been shimmed to 100lbs. I have
also restricted the oil to the cams at the banjo bolt. There is originally a .145"
oil hole, I weld it up and redrill to .085".
Oil pressure runs right at 100lbs down track.
I use Mobil 1 15w/50 automotive oil that we buy at Wal-Mart.
This will all be coverd as Marty Kane does his article on building the Top Eliminator. So
Stay tuned.
And that is the straight skinny. I hope that helps.
S.R.
![]()
There's only one good site out there that explains how to really take care of your chain, REGINA
![]()
Excel 4 sheet for calculation of B12 gearing provided by Brewsky!
![]()
![]()
Bandit tech freaks since 23 April 1998 :
Comments or suggestions to andersbrink@andersbrink.se
![]()
Copyright © 1998 by Anders Brink